Bulk Editor
Chapter 2 — The Bulk Editor. The grid view for high-speed catalog edits.
Plugin version: v2.1.4
The Bulk Editor is the main screen and the reason you installed Bossy. This chapter walks through every part of it: the filter row at the top, the column visibility picker, the product grid, how to select rows, every bulk-action panel, how to save, how to trash, and the floating command bar that follows you down the page.
Everything here applies to both Free and Pro unless marked otherwise. Where a Pro-only panel lives in the same control deck as the free ones, its Pro callout sits inline so you can see exactly what the upgrade adds.
2.1 Tour of the screen
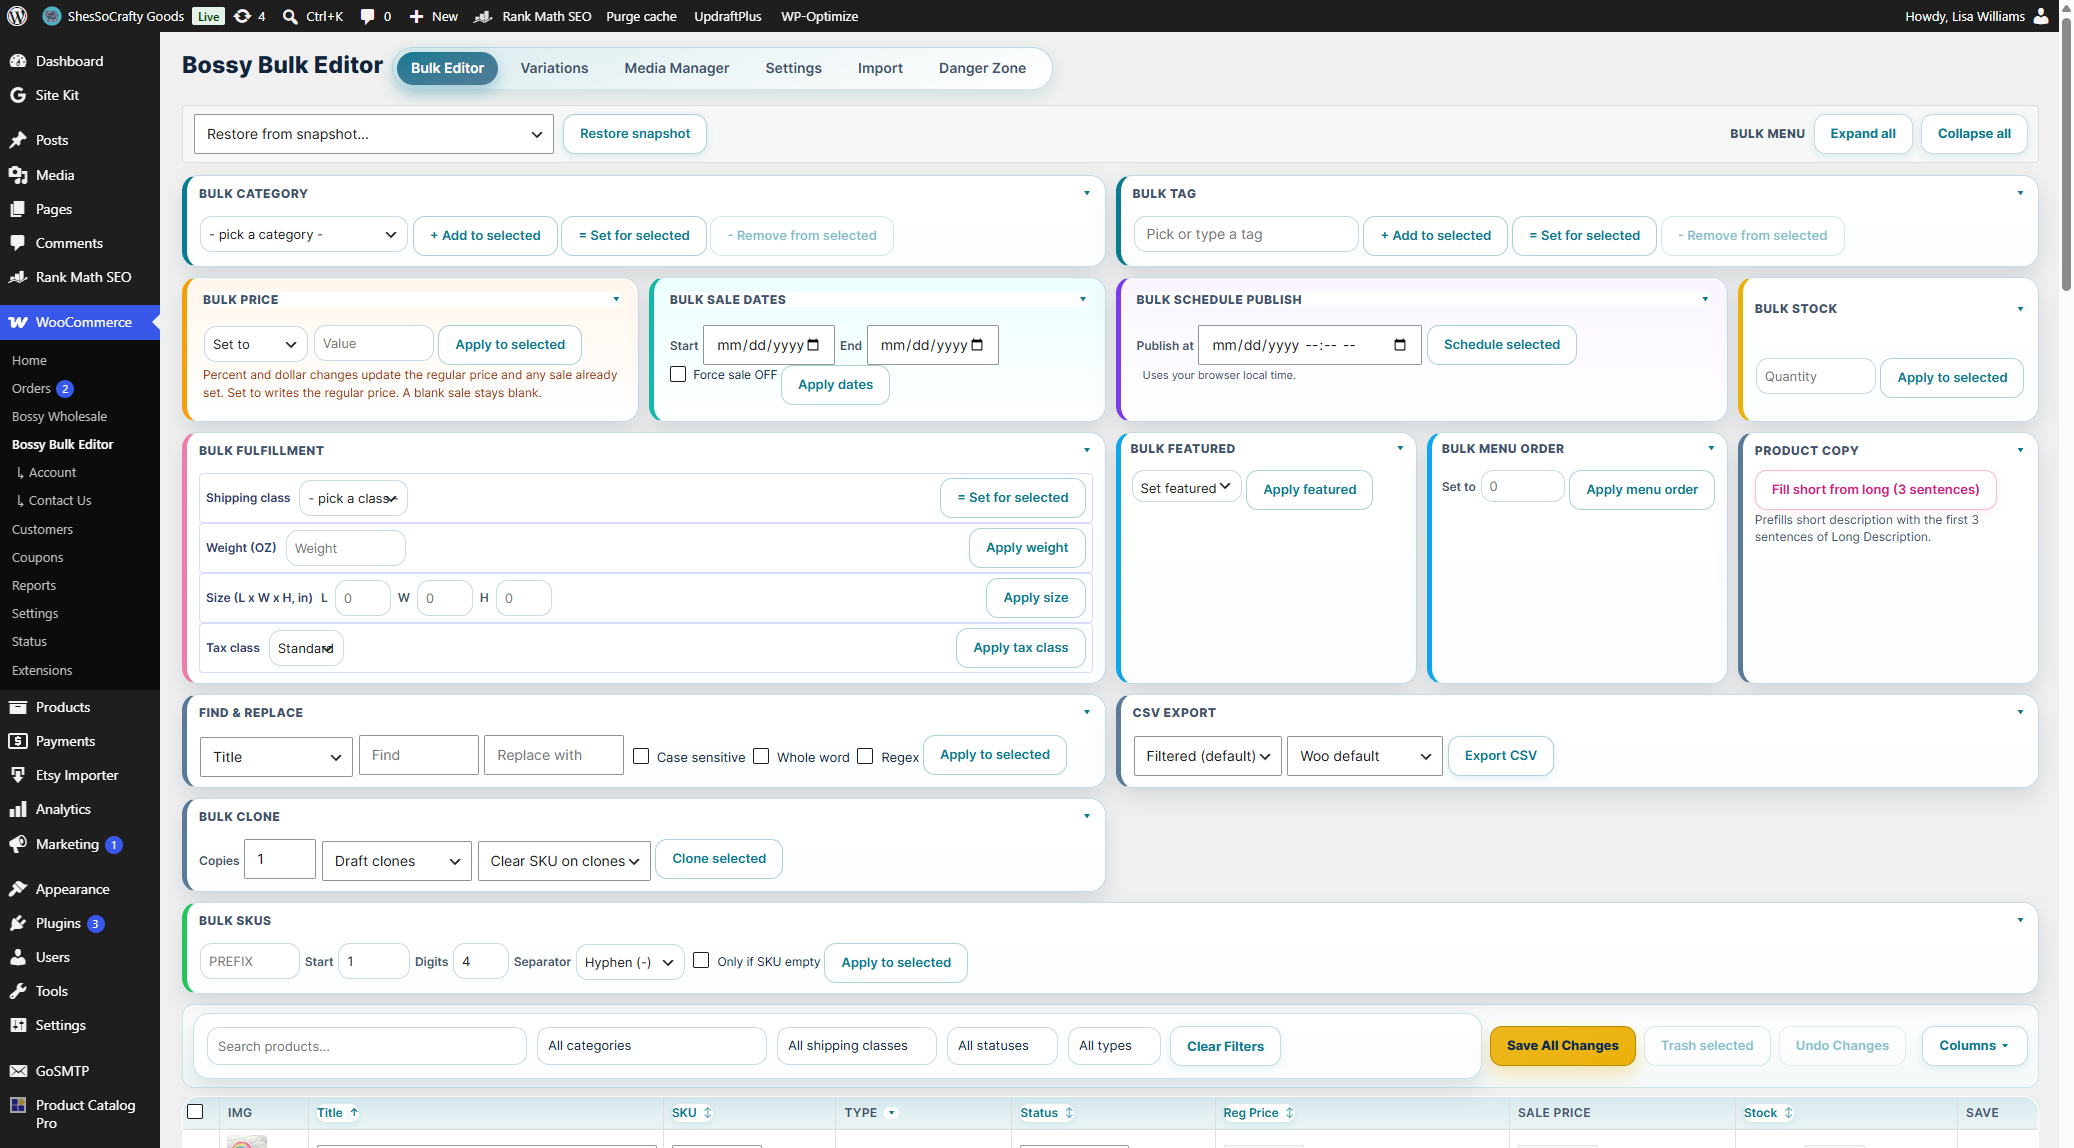
From top to bottom, the Bulk Editor has four primary zones plus one context-aware element:
- The Undo bar. Sits at the very top. Shows recent snapshots and lets you restore them. Chapter 7 covers this in full detail.
- The control deck. A stack of bulk-action panels — categories, tags, featured, menu order, tax class, shipping class, price, sale dates, schedule publish, package (weight and size), stock, SKU scheme, and product copy. In 1.11.0 the deck was reworked into a tighter, card-based layout with consistent panel placement across Free and Pro. Pro users see three additional panels: Find & Replace, CSV Export, and Bulk Clone.
- The sheet toolbar. Search box, filter dropdowns, Save All Changes button, Undo Changes button, Trash selected button, save status indicator, and the column picker anchor.
- The product grid. The editing grid itself — one row per product, paginated.
- The floating command bar. Anchored at the bottom-right corner of the screen. It carries two buttons that follow you as you scroll: a Save All Changes button (mirrors the toolbar Save All) and a red Add to Trash button for trashing selected rows without scrolling back up. The Save All button only appears when you have unsaved changes; the trash button only appears when rows are selected. Full details in sections 2.7 and 2.9.
Every bulk-action panel stays inert until you have selected at least one row in the grid. Until you select something, every Apply button is disabled — Bossy will not run a bulk action against nothing.
2.2 The filter row
The filter row sits just above the product grid. It controls what loads into the grid. Filters compound — every filter you set narrows the result further.
Search products. Searches product titles, SKUs (including variation SKUs), and category names. Multi-word queries use AND logic — every word must appear. Type and the grid filters live. Clear the field to see everything again.
Categories filter. Dropdown of the WooCommerce product categories that have at least one product. Pick one to show only products in that category.
Shipping class filter. Dropdown of your shipping classes, with two special options at the top:
- All shipping classes — no filtering by shipping class
- No shipping class — show only products with no shipping class assigned (handy for finding products that still need one set)
Status filter. Filter by post status:
- All statuses (default)
- Published — live on the storefront
- Scheduled — set to publish at a future date
- Draft — saved but not published
- Private — visible only to logged-in shop managers and admins
Type filter. Filter by product type:
- All types (default)
- Simple — single product, no variations
- Variable — has variations (sizes, colors, etc.)
Clear Filters. Resets all five filters at once. Useful when you want to bail out of a deeply narrowed view and start over.
2.3 The product grid
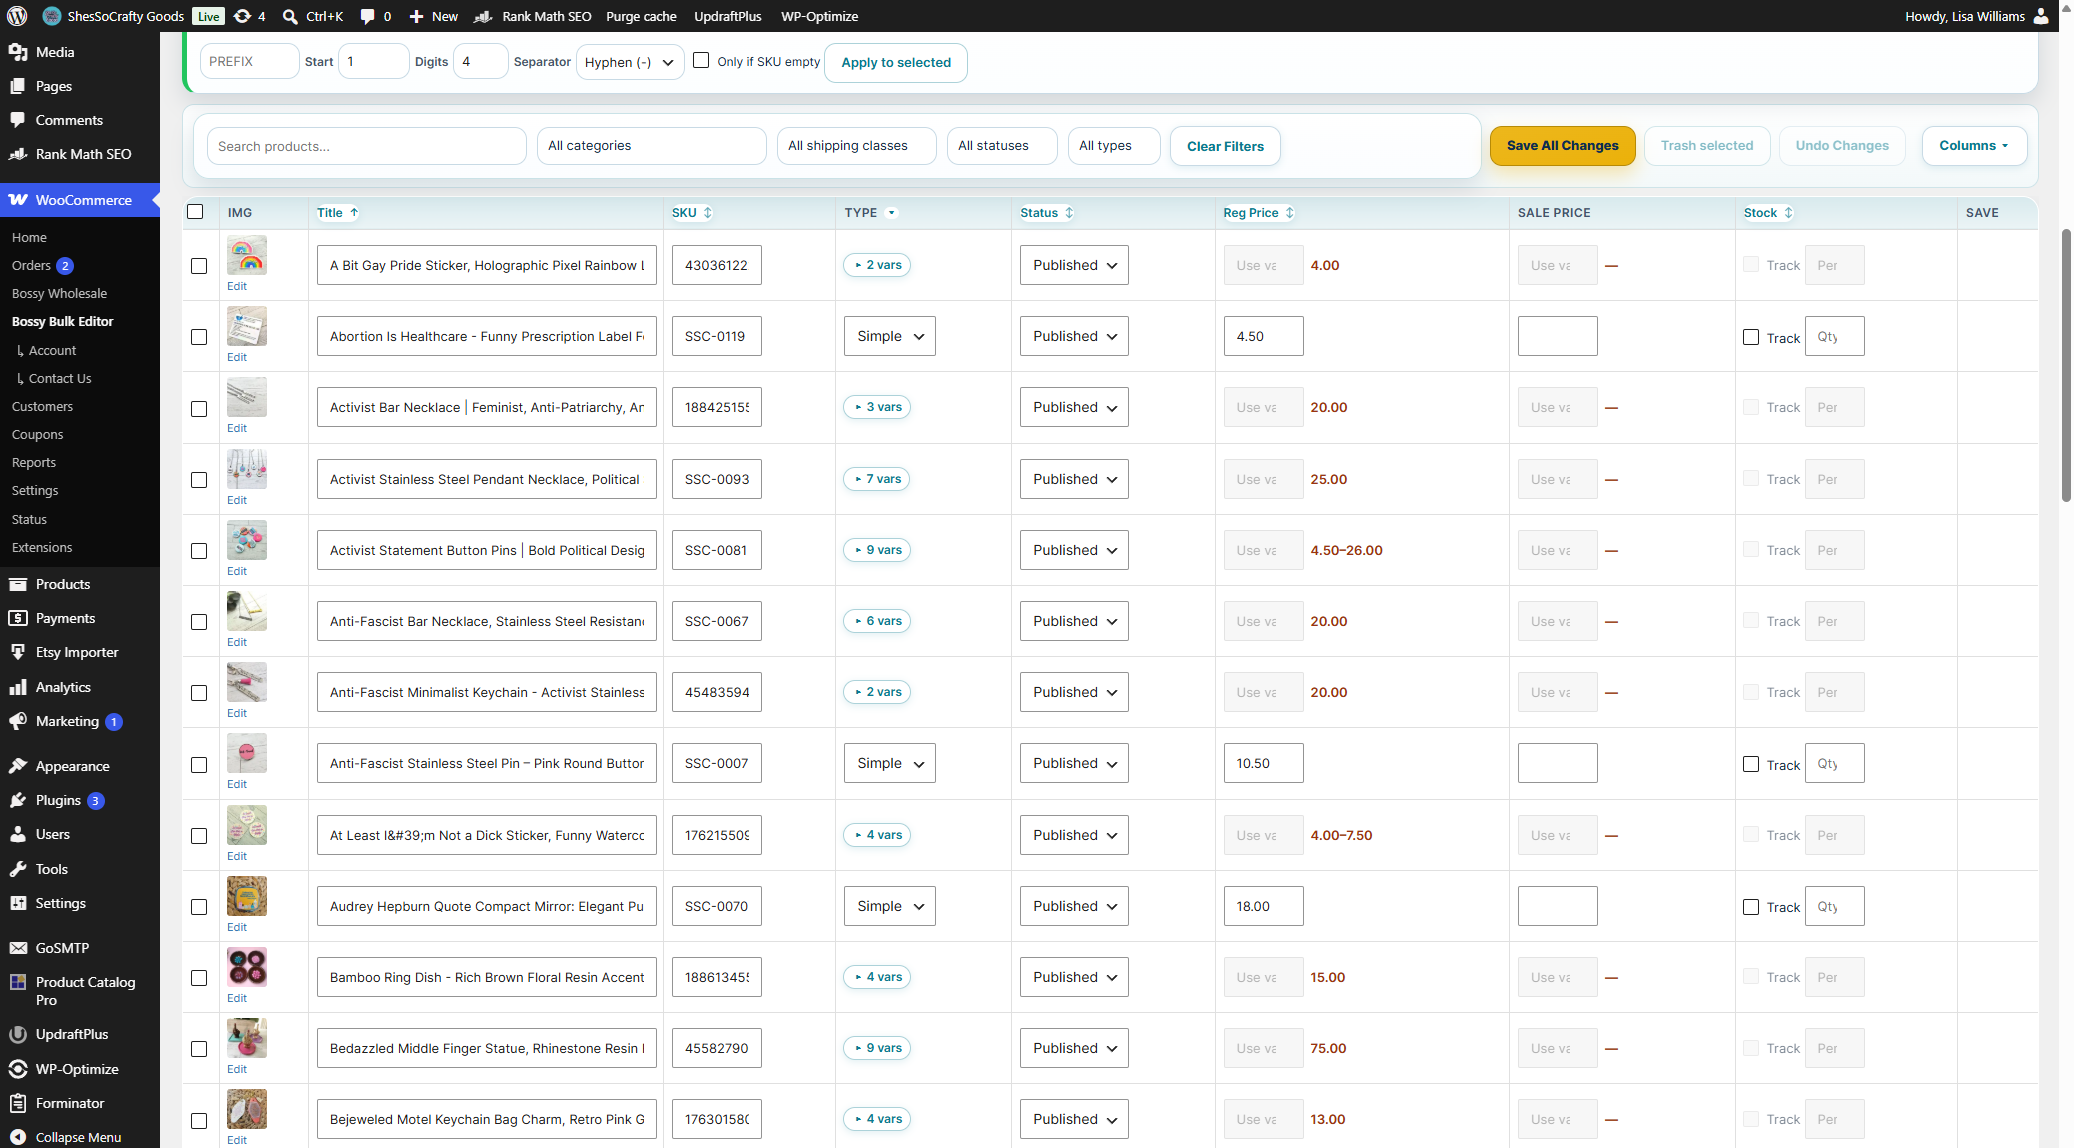
The grid lays out your products one row at a time — a fast, editable view of your catalog. The columns you see depend on what is enabled in the column picker (covered in 2.4).
Anatomy of a row
Every row has the same structure left to right:
- Select checkbox for marking the row for bulk actions
- Image thumbnail — the product's featured image
- Editable fields — whichever columns you have visible (title, SKU, price, etc.)
- Save button — saves changes for that one row only
Click any editable field, type your change, and the row enters a "dirty" state. That row's Save button darkens to show there is something to save, and the Save All Changes count in the toolbar ticks up.
Variable product rows
Variable products show an expand control on the row — a "vars" badge. Click it to expand the variation cards inline below the row. Variation editing is covered in Chapter 3.
Pagination
The grid loads products in pages to keep the screen responsive. At the bottom you see page navigation and the page count. Pending inline changes are not carried across pages — save before you paginate.
2.4 The column visibility picker
The grid is column-configurable. The free plugin ships 25 columns; Pro adds four more — Attributes, Custom Field, Label, and Placeholder — for 29 total. By default only seven of the toggleable columns are shown (the most-used ones); the column picker turns the rest on and off based on what you are working on today.
To open the column picker: click the columns control in the sheet toolbar (right side, near Save All Changes).
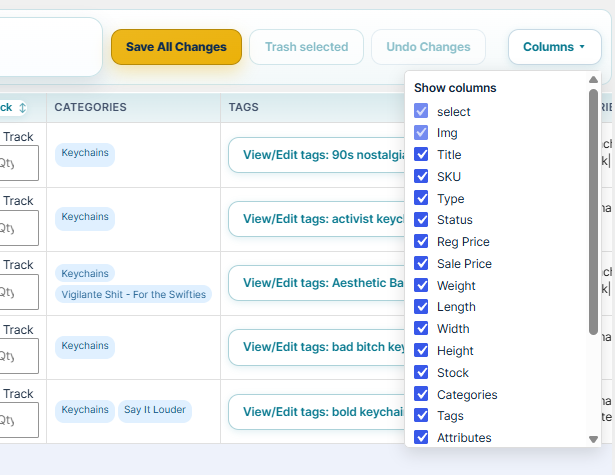
Your column preferences are saved in your browser (under the key bossy_col_visibility_v1). Switch browsers or clear your browser data and column visibility resets to the defaults.
What is visible by default
Out of the box the grid shows: Img, Title, SKU, Type, Status, Reg Price, Sale Price, Stock, and Save. That is the seven default toggleable columns (Title, SKU, Type, Status, Reg Price, Sale Price, Stock) plus the always-on locked columns.
Full column reference
Locked (always visible): Select, Img, Save.
Toggleable, shown by default: Title, SKU, Type, Status, Reg Price, Sale Price, Stock.
Toggleable, hidden by default (Free + Pro): Featured, Menu order, Tax class, Sale start, Sale end, Virtual, Downloadable, Weight, Length, Width, Height, Categories, Tags, Shipping Class, Short / long (descriptions).
Pro-only columns: Attributes, Custom Field, Label, Placeholder.
2.5 Selecting rows for bulk actions
Every bulk action operates on the rows you have selected. Selection works two ways:
Per-row checkbox. The first column of every row. Click to select that one product.
Select All header checkbox. In the header row at the top of the grid. Click to select every product currently visible on the page.
The selection counter sits next to the bulk-action panels and tells you how many rows are selected, like "12 selected". If it says 0, every Apply button stays disabled.
2.6 The bulk-action panels (the control deck)
Every bulk action lives in its own panel in the control deck. Each panel works the same way:
- Select rows in the grid (the panel's buttons stay disabled until you do).
- Fill in the inputs for that panel (pick a category, enter a price, etc.).
- Click the Apply button for that panel.
- Bossy runs the change against the selected rows, captures a snapshot for undo, and shows the result.
Applied changes update in place — Bossy patches the affected cells right where they sit instead of reloading the whole grid, so your scroll position, row selections, and any pending edits elsewhere are preserved. This holds even with a sort active: run the sequential SKU scheme with the SKU column sorted, and the new SKUs are written in sort-aware order without a jarring full refresh.
The free bulk-action panels are covered first, in order, followed by the three Pro-only panels.
Bulk Category
Apply categories to multiple products at once.
Dropdown: "- pick a category -" listing every WooCommerce product category.
Three action buttons:
- + Add to selected — adds the chosen category without removing existing categories
- = Set for selected — replaces all current categories on the selected products with just the chosen one
- - Remove from selected — removes the chosen category, leaving other categories intact
Bulk Tag
Same three-button pattern as Bulk Category, but for product tags.
- + Add to selected — adds the tag without removing existing tags
- = Set for selected — replaces all current tags with just the chosen tag
- - Remove from selected — removes the tag, leaves others intact
Bulk Featured
Flags or unflags selected products as Featured in one pass — the catalog-scale version of the star toggle in the Featured column.
Two action buttons:
- Set featured — marks every selected product as Featured
- Unset featured — clears the Featured flag on every selected product
[featured_products] shortcut. Curating a homepage collection? Filter to the category, Select All, Set featured — then Unset featured on the whole set when the promotion ends.Bulk Menu Order
Sets the menu order value on selected products. Menu order is the manual sort weight WooCommerce uses when a catalog or category is sorted by "Custom ordering" — lower numbers sort first.
Value field. A whole number (it can be negative to force products to the very front).
Apply to selected writes that menu-order value to each selected product.
Bulk Tax Class
Applies a WooCommerce tax class to every selected product in one pass.
Dropdown: lists your configured tax classes — Standard plus any custom classes defined under WooCommerce → Settings → Tax (e.g. Reduced rate, Zero rate).
Apply to selected sets the chosen tax class on each selected product. Like Shipping Class, there is a single action here because a product carries one tax class, not many.
Bulk Shipping Class
Dropdown: "- pick a class -" listing every shipping class defined in WooCommerce → Settings → Shipping → Shipping Classes.
= Set for selected replaces the shipping class on each selected product with the chosen one. There is only one action here because shipping class is single-value — a product has one class, not many.
Bulk Price
The most-used bulk action. Five modes, and no regular-versus-sale picker. Percent and dollar changes move the regular price and any sale that is already set, together. Set to writes the regular price. A blank sale stays blank — Bossy will not invent a sale price for you.
Mode dropdown:
- Set to — writes that amount as the regular price. If a sale is already set and it would land at or above the new regular price, Bossy clears that sale.
- % + — increases the regular price, and an existing sale price, by a percentage (10 = 10% increase)
- % - — decreases the regular price, and an existing sale price, by a percentage (20 = 20% decrease)
- $ + — increases the regular price, and an existing sale price, by a flat amount (5 = $5 more)
- $ - — decreases the regular price, and an existing sale price, by a flat amount (3 = $3 less)
Value field. A number input. Accepts decimals. Percents round to the cent.
A note under the controls says the same thing, so you do not have to remember it: percent and dollar changes update the regular price and any sale already set; Set to writes the regular price; a blank sale stays blank.
Apply to selected runs the math and saves. A big selection is applied in batches, so a large catalog finishes instead of dying on one long request. Bossy keeps one undo snapshot for the whole apply.
Bulk Sale Dates
Schedules sale start and end dates on selected products.
Start date. When the sale price activates.
End date. When the sale price expires. After this date, WooCommerce reverts to the regular price automatically.
Force sale OFF checkbox. An override that immediately clears the sale price and all sale dates on the selected products. Use it to kill a sale early or clean up old sale data.
Apply dates runs the change.
Bulk Schedule Publish
Schedules selected products to move from Draft (or any non-published status) to Published at a specific future date and time.
Publish at field. A datetime picker. The label notes it uses your browser's local time — Bossy converts it to your site time zone behind the scenes.
Schedule selected queues the publish. The selected products move to Scheduled status and go live automatically at the time you set.
Bulk Package (weight and size)
This panel sets physical shipping dimensions on selected products. It has two independent groups — Weight and Size — that apply separately (they are even two separate operations under the hood).
Weight group
The label follows your WooCommerce weight unit (WooCommerce → Settings → Products → Weight unit).
- If your store uses lb, the panel shows two inputs, lb and oz, so you can enter pounds and ounces separately.
- For all other units (kg, g, oz), a single weight input appears, labeled with the unit.
Apply weight updates only the weight on selected products. Size is untouched.
Size group
Three inputs: L (length), W (width), H (height). The label shows your WooCommerce dimension unit (in, cm, mm, etc.).
Apply size updates only the dimensions on selected products. Weight is untouched.
Bulk Stock
Sets a single stock quantity on all selected products.
Quantity input. A number, minimum 0.
Apply to selected writes that quantity to each selected product.
Bulk SKUs (sequential SKU scheme)
Generates sequential SKUs for selected products. Built for new-product launches when you want a predictable SKU pattern. This action targets whole products (simple or variable parents), not individual variations.
Prefix field. Up to 24 characters. Auto-uppercases as you type, and accepts letters, numbers, hyphen, and underscore (other characters are stripped, and leading or trailing dashes/underscores are trimmed). Example: SSC or MOTEL.
Start number. The first number in the sequence. Default 1.
Digits. How many digits to pad to, from 1 to 10 (default 4). With Digits = 4 and Start = 1 you get 0001, 0002, 0003. With Digits = 2 and Start = 7 you get 07, 08, 09.
Separator. Three options:
- Hyphen (-) — produces
SSC-0001,SSC-0002(default) - Underscore (_) — produces
SSC_0001,SSC_0002 - None (tight) — produces
SSC0001,SSC0002
Only if SKU empty checkbox. Checked, Bossy writes a new SKU only on products that currently have none, leaving existing SKUs alone. Unchecked, Bossy re-numbers every selected product — and to make clean sequential renumbering possible, it clears the targeted SKUs first so the new values can be claimed without WooCommerce forcing "-1" collision suffixes.
Apply to selected runs the assignment.
Product copy: Fill short from long
A single-button utility. It takes the first three sentences of each selected product's long description and writes them into the short description field. Handy for products that have a full description but an empty short description (which often shows in cart, checkout, and category pages).
Fill short from long (3 sentences) is the button. No inputs, no options — it runs as-is.
Bulk Find & Replace
Find-and-replace text across product fields on selected products.
Field dropdown: Title, Short description, Long description, or SKU.
Find field. The text to search for.
Replace with field. The replacement text.
Case sensitive checkbox. Checked, "Color" and "color" are treated as different strings.
Match mode — choose how Find is matched:
- Plain — matches your text anywhere it appears (the classic behavior)
- Whole word — matches only when Find stands alone as a word, so replacing "art" won't touch "cart" or "smart"
- Regex — treats Find as a regular expression for pattern-based replacements (capture groups, anchors, character classes, and the rest)
Apply to selected runs the replacement on every selected product.
Bulk CSV Export
Exports product data to a downloadable CSV. Two dropdowns control what gets included.
Scope dropdown:
- Filtered (default) — exports every product matching your current filter state, across all pages
- Selected only — exports only the rows you have checked
- All products — exports your entire catalog, ignoring filters and selection
Columns dropdown — the free plugin has a single fixed option; Pro gets three:
- Core fields (free) — the only option in the free plugin. A read-only export of the essentials: id, title, name, SKU, status, type, prices, stock, categories, tags, shipping class, featured, menu order, tax class, and image URL.
- Woo default (Pro, default) — everything in Core fields (free) plus wholesale price, manage stock, stock status, virtual, downloadable, short/long description, weight, dimensions, and the customer-personalization fields.
- Marketplace (Pro) — Woo default plus the full attribute set (up to 10 numbered attribute columns) and variation-row fields (parent link, variation image URL, per-variation attribute pairs, and
bossy_var_gallery) — the shape built for a full export → edit → re-import round-trip, including variations. - Selected columns (Pro) — just the columns currently shown in your column picker.
Include variation rows checkbox (Pro). Adds one row per variation, with its parent link, SKU, prices, stock, image URL, attribute pairs, and gallery, alongside the parent product rows. This checkbox is automatically turned on and locked when Columns is set to Marketplace, since that preset is built around having variation rows present.
Export CSV triggers the download to your browser's default downloads folder.
featured, menu_order, tax_class, virtual, and downloadable, and all five now map back in on import too — a CSV round-tripped through export → edit → import carries these fields both ways.Bulk Clone
Duplicates selected products. Useful for spinning up variants of an existing listing without rebuilding from scratch.
Copies field. How many copies of each selected product to create. Min 1, max 10.
Status dropdown:
- Draft clones — clones start as drafts, hidden from the storefront until you finalize and publish them
- Published clones — clones go live immediately
SKU mode dropdown:
- Clear SKU on clones — clones get blank SKUs (fill them in later, e.g. with the Bulk SKU scheme)
- Keep source SKU — clones inherit the source SKU (only workable if you immediately edit one, since SKU collisions block saving)
Clone selected runs the duplication.
2.7 Saving your changes
There are two save mechanisms — per-row Save and Save All Changes. The Save All control lives in two synchronized places: the sheet toolbar and the floating command bar.
Per-row save
Each row has its own Save button in the locked Save column (rightmost). Click it to save just that row — handy when you have edited one product inline and want to commit it before moving on.
Save All Changes (toolbar)
The Save All Changes button in the sheet toolbar saves every dirty row in the grid at once. A status pill next to it shows progress, success, or errors during the save. The same message also appears in a banner across the top of the screen: green when the save landed, blue while Bossy is still working, red when it failed. The green banner stays up for several seconds so you can actually see it. Errors stay until you dismiss them. The same banner is on the Variations tab and the Media Manager.
The floating command bar
Editing a large catalog means scrolling deep into the grid, far from the toolbar at the top. The floating command bar stays anchored to the bottom-right corner and carries two buttons that follow you down the page.
Save All Changes button — appears in the floating bar when you have dirty rows and runs the exact same save flow as the toolbar button. It disappears when there is nothing to save.
Add to Trash button (red) — appears when you have rows selected. Bulk-trashes the selected products from wherever you are in the grid, with the same confirmation dialog as the toolbar Trash selected button. See section 2.9 for full trash behavior and undo coverage.
Synchronization between the floating bar and the toolbar:
- Both Save All buttons trigger the same flow. The dirty-row count and enabled state stay in lock-step.
- The floating trash button mirrors the toolbar Trash selected state — shown only when a selection exists, disabled again immediately after the trash runs.
- Save status messages (progress, success, errors) appear in both places at once.
What "dirty" looks like
When a row has unsaved inline edits, Bossy marks it visually (a highlighted Save button / row indicator). Both the toolbar Save All Changes button and the floating bar track the count of dirty rows.
2.8 The "Undo Changes" button
Next to Save All Changes in the toolbar is a button labeled Undo Changes. It is different from the snapshot Undo bar at the top of the screen.
- Undo Changes (toolbar button) — discards inline edits you have made to the grid that have not been saved yet. A "throw away my unsaved work" button.
- Undo bar at top (snapshot system) — restores previously saved actions to their prior state. Covered in Chapter 7.
2.9 Deleting products from the grid
Bossy lets you trash products straight from the grid without leaving the screen. Products are trashed in bulk — select the rows, then use either the toolbar button or the floating button below. Both move products to WordPress trash (recoverable, not permanent deletion) and both work in Free and Pro.
This is the right tool for removing a handful of products — outdated listings, test products you made while learning, retired SKUs, a typo product saved by accident. For nuking large portions of your catalog at once (hundreds of products, a full test-data wipe, an abandoned migration), use Danger Zone (Chapter 8) — it is dramatically faster than trashing in batches.
Trash selected — toolbar button
The Trash selected button sits in the sheet toolbar. It is disabled until at least one row is selected.
- Select the rows to trash using per-row checkboxes or the Select All header checkbox.
- Click Trash selected in the sheet toolbar.
- A confirmation dialog appears: "Move X selected product(s) to trash?"
- Click OK. The selected products move to WordPress trash, the rows leave the grid, and a toast confirms.
Floating Add to Trash button
The toolbar button solves trash when you are near the top of the grid. The floating Add to Trash button solves it when you are not.
It sits in the floating command bar at the bottom-right corner of the screen, styled red so it reads immediately as a destructive action. It appears whenever you have at least one row selected and stays visible as you scroll; when your selection is empty, it disappears.
- Select the rows to trash anywhere in the grid, using per-row checkboxes or Select All.
- Scroll to wherever you need to be — or stay put. The red button is already in the bottom-right corner.
- Click the red Add to Trash button.
- The same confirmation dialog appears: "Move X selected product(s) to trash?"
- Click OK. The selected rows move to WordPress trash and leave the grid. A toast confirms, and Bossy captures a snapshot for undo.
Undo: the best part about Bossy trash
Here is what makes Bossy's trash better than the native WooCommerce alternative: trash actions are captured by Bossy's snapshot system. Every trash is recorded in your undo bar.
Two ways to recover a trashed product:
- Bossy Undo (recommended). Open the undo bar at the top of the Bulk Editor, find the trash snapshot, click Restore. The product comes back exactly as it was — variations, prices, descriptions, images, and meta.
- WordPress Trash. Go to Products → All Products → Trash tab, find the product, click Restore. Standard WordPress recovery, works like any other trashed post.
Both paths produce the same result. Bossy Undo is faster because you never leave the Bulk Editor. WordPress Trash still works after the Bossy snapshot has rolled off retention (see Chapter 7.2).
Permanent deletion: when trash is not enough
Bossy's grid trash buttons never permanently delete. Trash always goes to WordPress trash. This is deliberate — there is no "permanently delete" button you can hit by accident from the grid.
To permanently delete a product:
- Go to Products → All Products → Trash tab in WordPress admin
- Either click Delete Permanently on a specific trashed product, or click Empty Trash to clear them all at once
For wiping the whole catalog at once, use Danger Zone (Chapter 8). For removing a specific test product for good, trash it from the Bossy grid, then delete it permanently from WordPress Trash. Two steps — but neither one is the kind of mistake that haunts you.
Permissions: who can trash what
Bossy trash respects WordPress capabilities. To use Trash selected, a user needs:
- The
edit_productscapability (standard for Administrator and Shop Manager roles), and - The
delete_postcapability for each specific product being trashed — WordPress checks this per-product at trash time.
If a user can see the grid but the Trash buttons are disabled, missing, or fail with a permission error, they lack delete_post on those products. This most often happens with custom roles from membership or staff plugins that grant editing but withhold deletion. Add the delete_post capability to that role to grant trash access.
2.10 Common workflows
Workflow 1: Putting a category on sale for the weekend
- Open Bossy at WooCommerce → Bossy Bulk Editor.
- In the Categories filter, pick the category going on sale (e.g. "Statement Necklaces").
- Click the Select All checkbox in the grid header to select every product in the filtered view (one page at a time — see 2.5).
- Verify the selection counter shows the right number.
- In the Sale Price column, enter the sale price on each product that should go on sale. Leave it blank on anything that should stay full price. Bulk Price will not create a sale on a blank field.
- Click Save All Changes and wait for the green Saved banner at the top of the screen.
- Select those rows again.
- In Bulk Sale Dates: pick the start and end dates.
- Click Apply dates. Confirm.
- Done. Sale prices activate on the start date and WooCommerce returns to the regular price after the end date.
Workflow 2: Launching new products with sequential SKUs
- Open Bossy and set the Status filter to "Draft".
- Select the products you just added (Select All if the whole Drafts list is the launch batch).
- In Bulk SKUs: enter your prefix (e.g.
SSC), Start number (e.g.1), Digits (e.g.4), Separator (e.g. Hyphen). - Check Only if SKU empty if any drafts already have SKUs you want to keep.
- Click Apply to selected. Each product gets a sequential SKU like SSC-0001, SSC-0002.
- When ready to launch, select the same products and use Bulk Schedule Publish to set a go-live time.
Workflow 3: Renaming a brand across your catalog (Pro)
- Filter to the brand's category to narrow the grid.
- Click Select All in the grid header.
- In Find & Replace: pick the Field (Title, a description, or SKU).
- Enter the old name in Find and the new name in Replace with.
- Decide whether to enable Case sensitive, and pick a Match mode — Plain for a straight swap, Whole word to avoid partial hits like "art" inside "cart", or Regex for pattern matches.
- Click Apply to selected. Bossy runs the replacement and captures a snapshot.
- Repeat per field that needs updating — titles first, then descriptions, then SKUs.
Workflow 4: Adding a sale tag to a curated list of products
- Use the search box to find your first product. Check it.
- Search for the next product. Check it.
- Repeat to build your list (selection survives across search changes since you are not paginating).
- In Bulk Tag: pick your "Sale" tag from the dropdown.
- Click + Add to selected. The tag is added to all selected products without disturbing existing tags.
Workflow 5: Cleaning up test or retired products
- Filter or search to find the products to remove. Status = "Draft" is useful for test products.
- Select the rows to trash. Verify the selection counter.
- Click Trash selected in the sheet toolbar (or the red floating button).
- Confirm the bulk trash dialog.
- Changed your mind? Open the Undo bar at the top and restore the snapshot.
Chapter 2 recap
- The Bulk Editor has four zones: Undo bar, control deck, sheet toolbar, and product grid.
- Filters narrow what is in the grid. Selection determines what a bulk action affects.
- Every bulk action follows the same pattern: select rows, fill the panel, click Apply.
- Apply buttons stay disabled until you select rows. That is a safety feature.
- Save All Changes commits inline edits. Bulk-action panels save themselves on Apply.
- The grid has 25 columns in Free and 29 in Pro. Only Select, Img, and Save are locked; the seven default-visible toggleable columns are Title, SKU, Type, Status, Reg Price, Sale Price, and Stock. Sale start/end, Virtual, and Downloadable are inline grid toggles only — there is no dedicated bulk-action panel for them; use Bulk Sale Dates for the sale-date pair, or edit Virtual/Downloadable per row.
- Featured (a star toggle), Menu order, and Tax class columns each have a matching bulk-action panel, and the control deck uses a card-based layout consistent across Free and Pro.
- "Fill short from long" overwrites the short description — it is snapshot-backed, so undo has your back.
- SKU prefixes are up to 24 characters, auto-uppercased; digits pad 1–10.
- A floating command bar at the bottom-right gives you an always-available Save All Changes button (when rows are dirty) and a red Add to Trash button (when rows are selected).
- Select All only selects rows on the current page, not across pagination.
- SKU collisions are the single most common cause of failed saves. Use unique SKUs.
- Pro adds three bulk actions: Find & Replace (with Plain, Whole word, and Regex match modes), CSV Export, and Bulk Clone.
- Trash selected (Free + Pro) moves products to WordPress trash with full Bossy Undo coverage. Permanent deletion still requires WordPress Trash → Delete Permanently or Danger Zone (Chapter 8).